|
|
|
|
||
|
Comment regler sa moto ? : Partie 3 - Amortissement hydraulique |
||
|
|
|
|
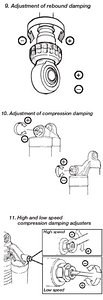
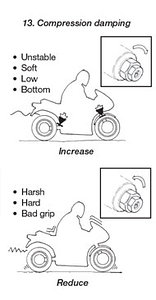
Setting the Damping Depending on the model there are adjustments for rebound damping, compression damping and adjustment of the length of the shock absorber. Damping is set with knobs and screws with a normal right-hand thread. By turning them clockwise the damping action is increased, and by turning them counter clockwise it is reduced. The knobs have definite positions with noticeable "clicks", making it is easy to count to the right setting. Rebound damping action affects the characteristics of the motorcycle most. The setting knob is located at the bottom on the piston rod (Fig.9). It can be adjusted in about 40 steps. NOTE! The compression damping knob is located at the end of the external reservoir (Fig.10). This can be adjusted in about 25 steps. Some models (PRX) have separate adjusters for high speed compression and low speed compression (Fig.11). The low speed compression is adjusted in 25 steps. Use a slotted head screw driver. The high speed adjuster has a wide range within about 48 clicks. Use a 14 mm key. NOTE! CAUTION! The one way compression adjuster is gold anodized. The adjuster (slotted head screw) has a range of 25 steps. Do not turn the hexagon as this will allow for the oil to spurt out of the shock absorber. NOTE! Setting your Motorcycle By utilizing the adjustment possibilities you can test by trial and error, and learn how they affect your motorcycle. Always begin by test riding the motorcycle with all adjustments at their delivery setting. Choose ashort run of varying character, i.e. long and sharp bends, hard and soft bumps. Keep to the same run and adjust only one setting at a time. Start with the rebound damping (Fig.12): If the motorcycle is hard and bumpy, especially over a series of bumps, then the rebound damping should be reduced. Turn counter clockwise 4 steps, test run and make any necessary correction to 2 steps. Compression damping (Fig.13): If the motorcycle has a low riding position, the low speed compression should be increased. Turn clockwise four steps and test run again. If this was too much then turn back two steps (counter clockwise). If it feels unsmooth over small continuous bumps or has bad grip, the low speed compression should be decreased. Turn counter clockwise four steps. Test run and make any necessary correction in two steps at the time. If the motorcycle feels unstable in fast corners and has a tendency to bottom easily in depressions and chicanes, the high speed compression should be increased. Turn clockwise six steps and test run again. If this was too much then turn back three steps (counter clockwise). If it feels harsh and too rigid or has a tendency to hop during braking, the high speed compression should be decreased. Turn counter clockwise six steps. Test run and make any necessary correction in three steps at the time. When you have sufficient feel of the motorcycle you can make further fine adjustments. It is feeling and experience that counts. NOTE! When you feel that you have achieved an improvement, go back to where you started and check once more. Be observant of other relevant factors such as tyres, temperature, etc. Test run to make sure whether further fine adjustment should be made. |
||